Elmar Solar MPPT
Profinity monitors the Elmar Solar Maximum Power Point Tracker (MPPT). Profinity supports the 3A, Race and Best with one component, because they share one communications protocol. They use the CAN database (DBC) file described in the Elmar MPPT DBC documentation.
Elmar Solar makes MPPTs that optimise the output of solar arrays. The Elmar range distributed by Prohelion consists of the Elmar 3A MPPT, the Elmar Race MPPT and the Elmar Best MPPT. The Solar Charge Controllers by Elmar documentation describes them.
Quick start
You need the Modify components permission to add the component. The Elmar Solar MPPT must send its CAN messages on a CAN network that the Profinity host reads through a CAN adapter in the Profile. The component shows only the messages it receives from that network.
- Add an Elmar Solar MPPT to the Profile.
- Set Base address to the CAN address of the MPPT, as described in the Elmar MPPT DBC. The default is
0x300. - Select ADD COMPONENT at the bottom of the dialog.
- Open the Elmar Solar MPPT dashboard from the sidebar.
- Check that INPUT VOLTAGE and OUTPUT VOLTAGE show values, and that the BATTERY STATE panel shows On or Standby.
Add the MPPT to a profile
To monitor an Elmar Solar MPPT, add an Elmar Solar MPPT tracker to the Profile. Profinity requests the settings in the following table. The Change Settings button on the MPPT dashboard changes these settings later.
| Setting | Type | Description | Default |
|---|---|---|---|
| Name | Text | The name of the component. Must be unique. | Elmar Solar MPPT |
| Milliseconds valid | Time | The timeout of the device in milliseconds, from 1 to 60000, or -1 for no timeout. | 5000 |
| Base address | Hexadecimal number | The CAN address of the MPPT, as described in the Elmar MPPT DBC. | 0x300 |
If the network receives no traffic from the device within the Milliseconds valid time, Profinity treats the connection as lost.
Once the MPPT is added to the Profile, the Elmar Solar MPPT dashboard is available in the sidebar. The dashboard displays graphs of input voltage and output power, error status indicators and, under the MORE DETAILS banner, the input, output, temperature and auxiliary supply readings.
flowchart LR
    subgraph Device["Elmar Solar MPPT"]
        MPPT["CAN messages"]
    end
    subgraph Profile["Profile"]
        Dashboard["MPPT dashboard"]
        DBC["DBC view"]
    end
    MPPT --> Dashboard
    MPPT --> DBC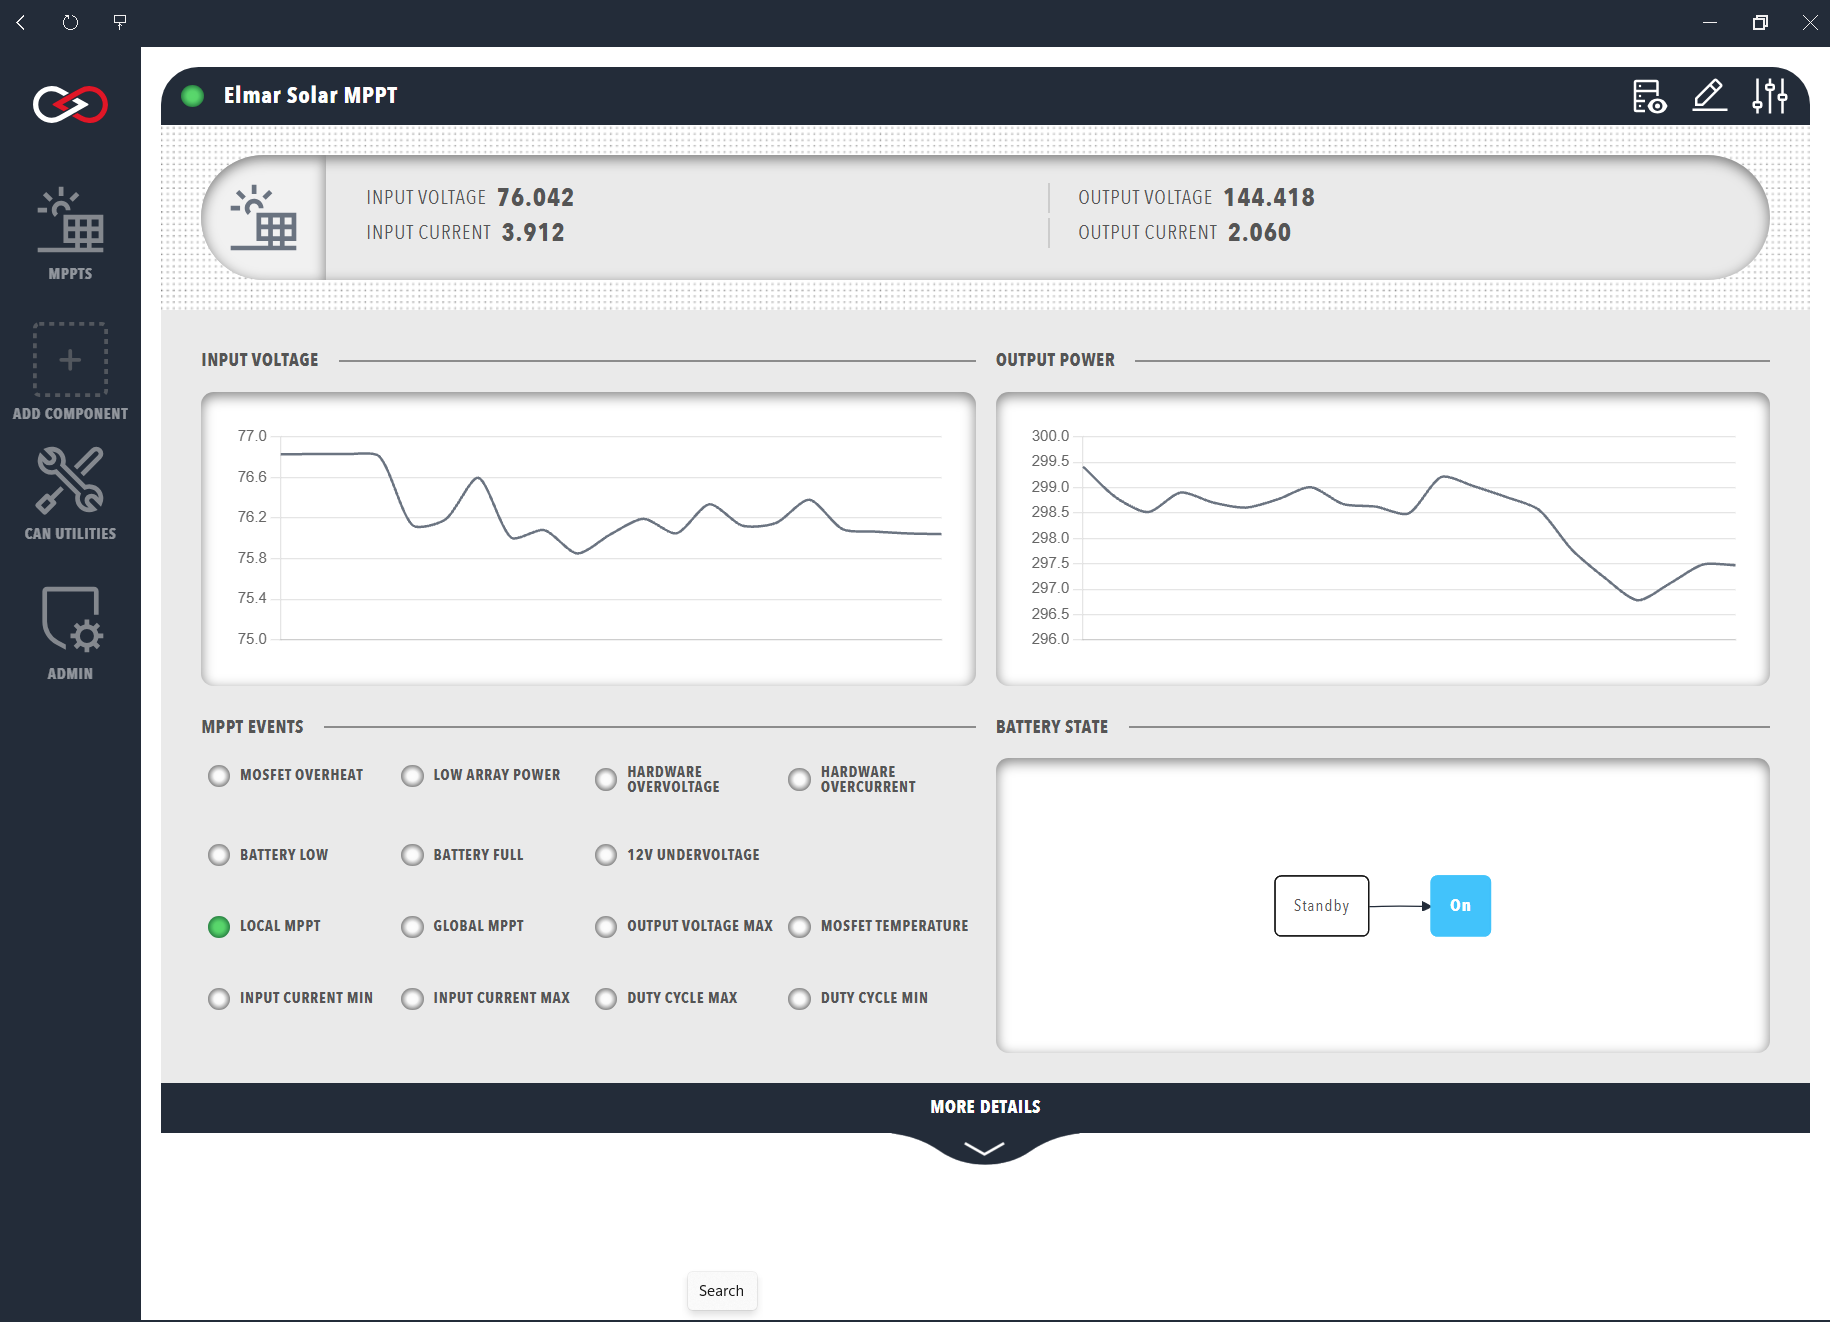
The raw CAN data from an Elmar Solar MPPT is also available in the DBC view. The Messages and Signals button on the dashboard opens it.
MPPT data
The summary row of the MPPT dashboard shows the values in the following table.
| Cell | Meaning |
|---|---|
| INPUT VOLTAGE | The voltage produced by the connected solar array, in volts. |
| INPUT CURRENT | The current delivered by the connected solar array, in amps. |
| OUTPUT VOLTAGE | The output voltage of the MPPT, in volts. |
| OUTPUT CURRENT | The output current of the MPPT, in amps. |
The dashboard also shows two time-series graphs of the input voltage and output power of the MPPT. Hover over a graph to see the data in greater resolution.
The MPPT EVENTS panel shows status indicators for MPPT events. Error indicators are red. Limit indicators are amber, except the local and global MPPT lamps, which are green. Each lamp shows On or Off.
| Type | Colour | Indicators |
|---|---|---|
| Error | Red | Low array power, hardware overvoltage, hardware overcurrent, metal-oxide-semiconductor field-effect transistor (MOSFET) overheat, 12 V undervoltage, battery low and battery full |
| Limit | Amber | Input current minimum and maximum, output voltage maximum, duty cycle minimum and maximum, and MOSFET temperature |
| Limit | Green | The local and global MPPT lamps, each On or Off |
The events correspond to the Status message of the Elmar MPPT DBC.
The message carries the error and limit flags, the mode, and the CAN receive and transmit error counters.
The Solar Charge Controllers by Elmar documentation links the datasheet of each product.
A simplified flowchart shows the MPPT state, which is either Standby or On according to the Mode signal of the Status message.
The grey box marks the current state.
Expand the MORE DETAILS banner to see these readings:
- Input, output, and power readings.
- MOSFET, controller, and power connector temperatures.
- The auxiliary 12 V and 3 V supply and battery-side output voltages.
The state of a connected battery is described on the Prohelion BMU page.
Tags
The component publishes the tags OutputPower, InputPower, and MpptStateText.
Example
This example is for illustration.
It adds a second Elmar Solar MPPT to a profile, with the CAN base address 0x6A0 (1696 in decimal).
Add it under components: in the profile.yaml file of the profile.
- component:
    type: ElmarMPPT
    id: ElmarMPPT2
    name: Elmar Solar MPPT - 6A0
    tagTreeParentPath: /
    milliValid: 5000
    baseAddress: 1696
Use a different id and Base address for each MPPT in the profile.
Troubleshooting
| What you see | Cause | What to do |
|---|---|---|
| "There is already a component in this profile operating in this CAN Address range, change your CAN Base Address to avoid a conflict" | The MPPT uses a fixed CAN address range of 0x0F above its Base address, and another component in the profile uses an address in that range | Change the Base address of this MPPT, or of the other component, so that the ranges do not overlap, then select ADD COMPONENT again. |
| INPUT VOLTAGE and OUTPUT VOLTAGE show no values, and the MPPT is treated as lost | No CAN traffic from the MPPT arrives within Milliseconds valid, either because Base address does not match the MPPT or because the MPPT sends on a network that the Profinity host does not read | Check that Base address matches the CAN address in the Elmar MPPT DBC and that the MPPT is on the network the host reads. If traffic is slow, raise Milliseconds valid (1 to 60000, or -1 for no timeout). |