CAN Bridge Configuration
The CAN–Ethernet bridge has three configurable settings:
-
Static IP: This setting determines whether the bridge should use a static IP address and also allows for the address to be set. This is useful for point-to-point connections where no DHCP server exists on the network.
-
Bus Number: This is the setting that allows you to have multiple virtual CAN busses running simultaneously, with different CAN bridges on the same Ethernet segment
-
CAN Bit rate: This is the Bit rate that the bridge should use to communicate on it's physical CAN bus.
These settings can be changed using the CAN–Ethernet Bridge Configuration Tool described below.
CAN-Ethernet Bridge Configuration Software
CAN-Ethernet Bridge Configuration is now included in Profinity
Profinity is now the recommended approach for configuring your CAN-Ethernet Bridge, to do so add your bridge to a Profile then right mouse click configure it. This documentation is for client still using the old configuration software, but we would recommend upgrading if possible.
The CAN–Ethernet Bridge Configuration application provides three functions. First, it enables users to modify the Bridge Configuration of the bridges connected to the network. Secondly, it allows users to view the bridges connected to their network and select the bridge corresponding to the virtual network that they wish to use. Third, it allows updating the bridge firmware.
Figure 5 shows a screenshot of the configuration tool.
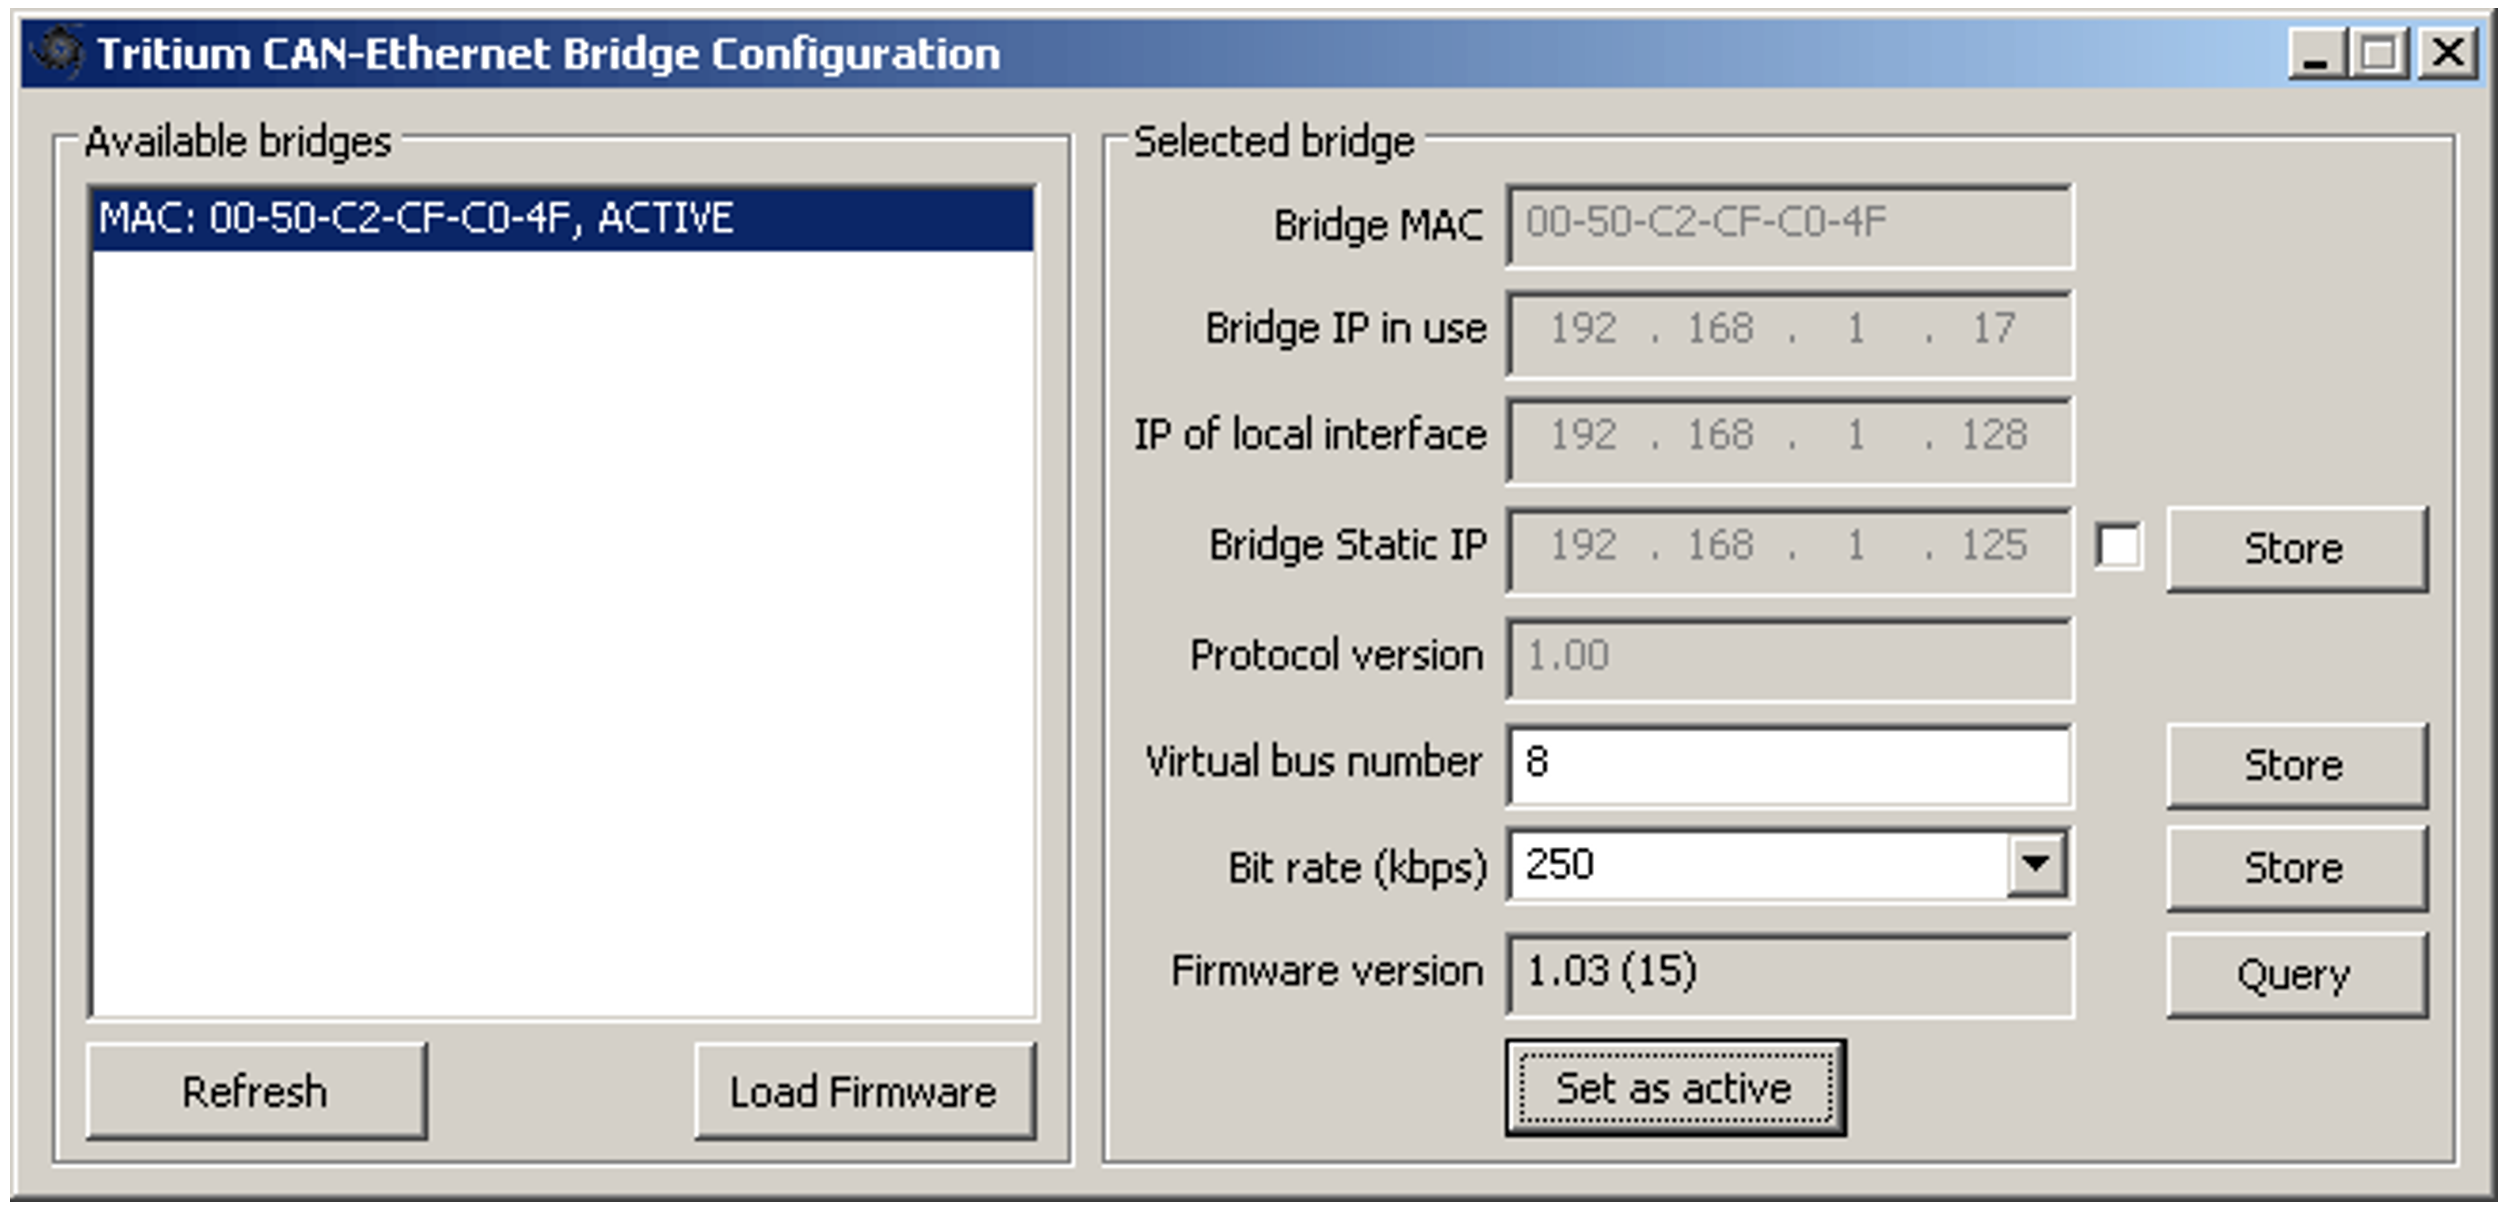
The listbox on the left shows detected CAN–Ethernet bridges. Details about the selected bridge are shown on the right.
These details are:
-
Bridge MAC: The MAC address of the bridge. This is unique for each bridge, and is fixed in the factory and cannot be changed.
-
Bridge IP in use: The IP address assigned to the bridge by your DHCP server, AutoConf, or manually (if a Static IP is set). This is the IP address that TCP/IP connections will be made to. If this IP address is not on the same subnet as the IP address of the local machine, TCP/IP connections will not be available and programs that rely on them will not work.
-
IP of local interface: The IP address on the local machine assigned to the interface connected to the network on which the bridge resides. This information is useful for identifying bridges when the PC has multiple network interfaces (eg, wired, wireless). This IP address must be on the same subnet as the bridge in order for TCP/IP connections to be available.
-
Bridge Static IP: The saved static IP address in the Bridge. This is editable when using a Static IP, which is enabled by setting the adjacent check-box. Upon storing the setting the bridge will restart using either the Static IP (when enabled) or an IP attained from the DHCP server (when disabled). Note: the Static IP subnet is not configurable and is automatically set based on the class of the network (A, B or C). The value is set in the bridge by pressing Store.
-
Protocol Version: Ethernet communications protocol version.
-
Bus Number: The virtual CAN network that this bridge should connect to. This may be set by modifying the value in the edit box and pressing Store.
-
Bit rate: The bit rate of the CAN network that the bridge is connected to. This rate may be set by either selecting a value in the drop-down list, or directly entering the value in the edit box and pressing Store.
-
Firmware Version: Bridge firmware version. This can be obtained from the bridge by pressing the Query button.
When the Bridge Configuration is changed, the list of bridges will be refreshed. This may take a few seconds. When a bridge is disconnected from the network, it is automatically removed from the list.
The button labelled Set as active is used to register the selected bridge and virtual bus for use by all Prohelion programs on the machine. Active bridges are identified by the local interface they are connected through (i.e. the local IP address) and their virtual bus number. Thus, it is possible for multiple bridges to be active, e.g. in the network topology shown in Figure 2. A bridge must be set as active when it is first used on a given PC, and again whenever the local IP address of the machine changes. The currently active bridge(s) are labelled as ACTIVE in the list.
It should be noted that the configuration tool uses a TCP/IP connection to modify the port, bit rate and Static IP settings on a bridge. Therefore, if the bridge is on a different subnet as the local machine these settings cannot be modified, and this network arrangement is therefore not recommended. It is highly recommended to configure bridges on a LAN with a DHCP server or Static IP configured on the same subnet.
CAN-Ethernet Bridge Firmware Bootload Wizard
The CAN–Ethernet Bridge Loader wizard provides the ability to load updated firmware images into the bridge, to provide new features and functionality. It is access by selecting the bridge you wish to load in the CanBridgeConfig utility, then clicking the Load Firmware button
Figure 6 shows a screenshot of the loader tool.
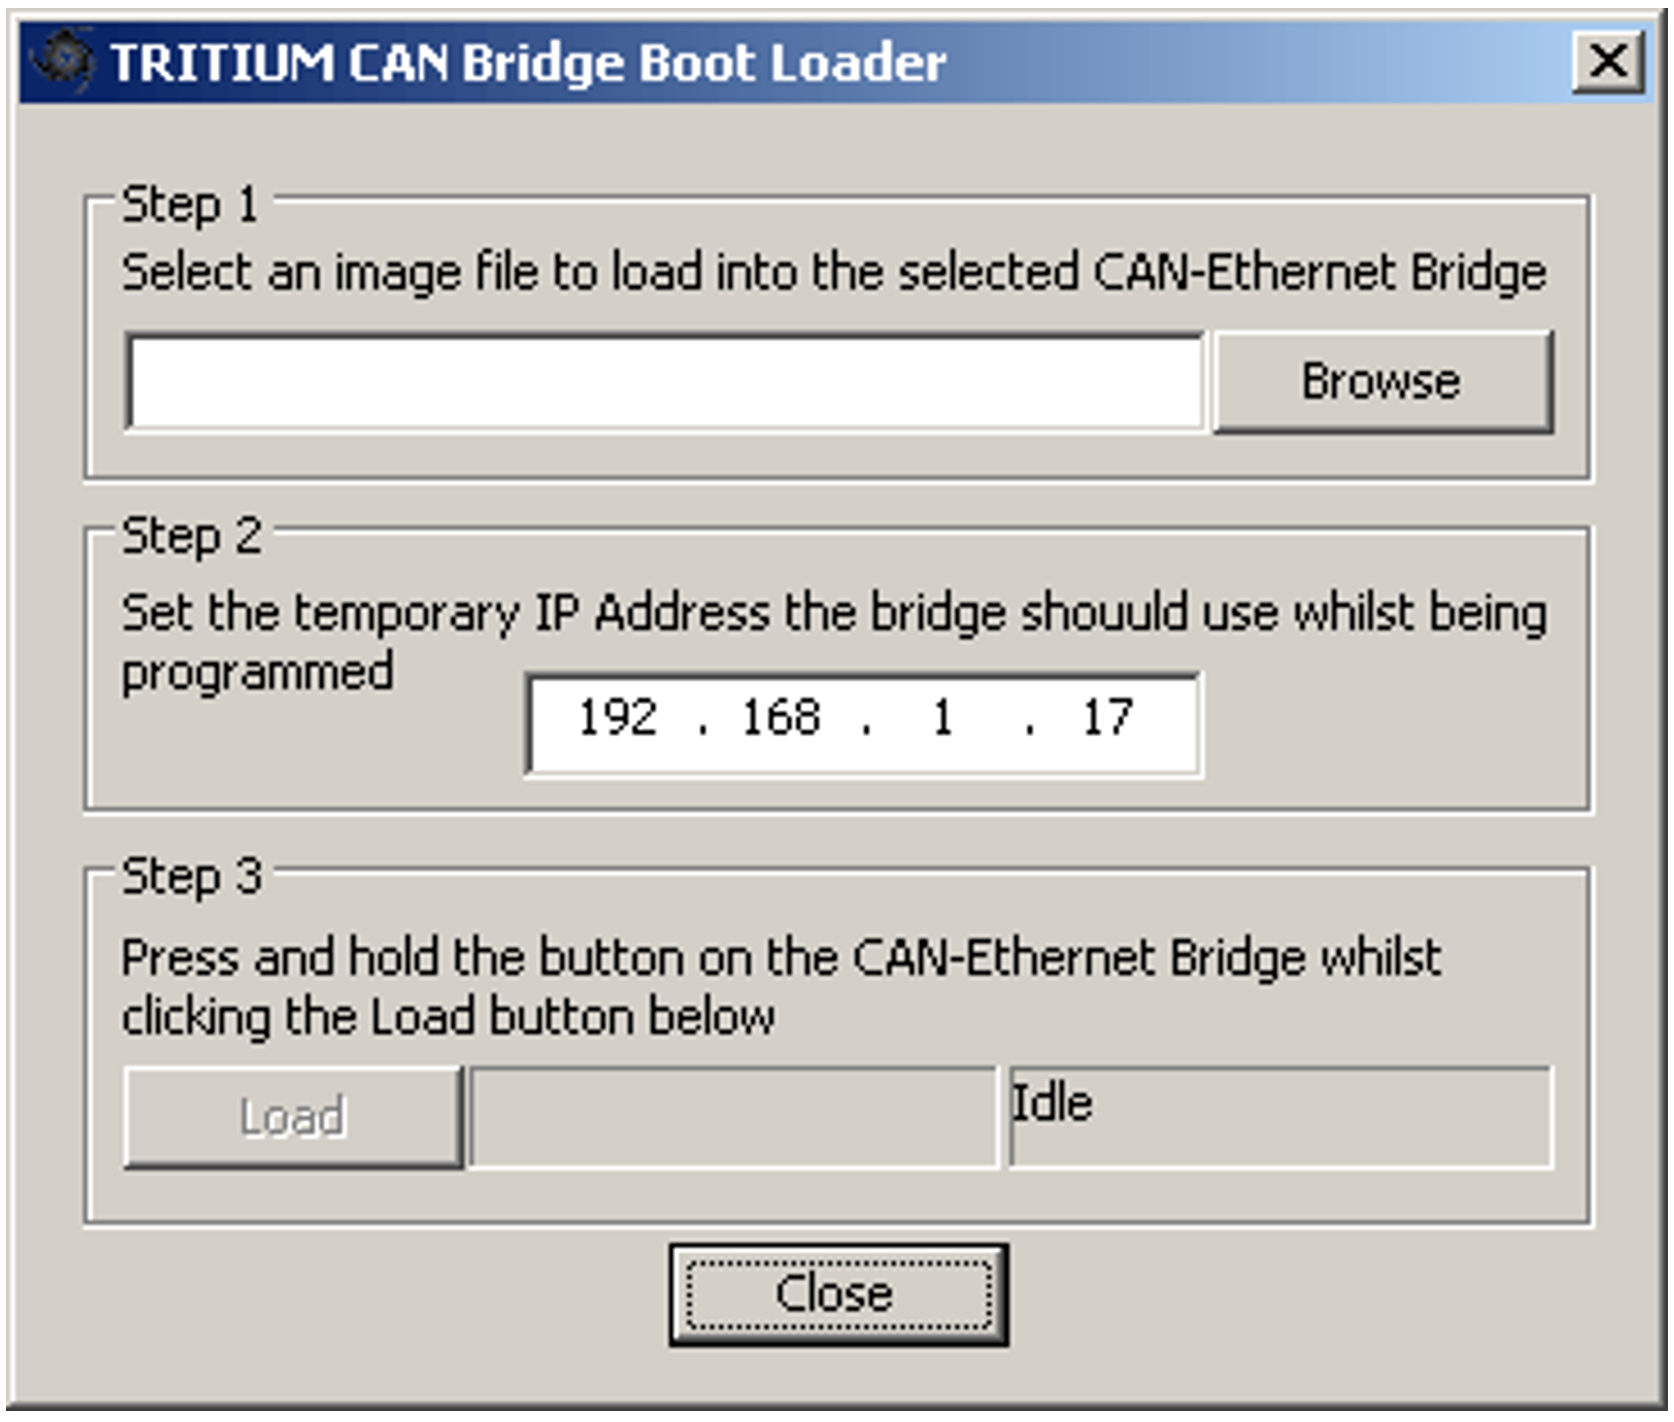
To use the tool, complete the following steps:
1. Get the latest firmware image file (.teb) from Prohelion (contact support)
2. Run CanBridgeConfig, select the bridge to load, and click Load Firmware
3. Browse to where the image file is saved and select the file
4. Check that the temporary IP address that will be assigned is sensible. In most cases the utility will choose a valid address on the same subnet, and the default will not require changing
5. Press the Load button, and the application will begin waiting for a bridge
6. Hold down the button on the bridge front panel
7. Apply or cycle power to the bridge while continuing to hold the button, until the loader utility finds the bridge. The button can now be released.
8. The loader application will load in the new firmware
9. Once the load is complete, press and hold the button on the bridge until the status LED flashes briefly, in order to load factory default settings